.svg)
1. Wet Weather
A welcoming first hole that gently bends left to right and allows you to ease into the round. The tee shot asks for accuracy but offers plenty of forgiveness, with the warm-up area (left) and 9th fairway (right) providing safe landing for stray shots. Tall trees frame a fairway drive which would lead into a mid to short iron approach. The green is guarded by bunkers on both sides and runs on the slower side, so don’t be afraid to commit to your line. A solid par here is a great way to start.
A short par 3 that asks for commitment early in your round. A short tee stroke (8-P iron) from the whites.The hole is more exposed than it looks, with wind often in play as you pass over water, until you reach the green. Bunkers front and sides punish loose shots. Missing short or just long leaves a workable recovery, but drifting left can bring trees into play. Hit the green and you’ll have a real birdie look on a mostly flat putting surface. Between this and the 12th it's been the home of a lot of hole-in-ones so go for glory!
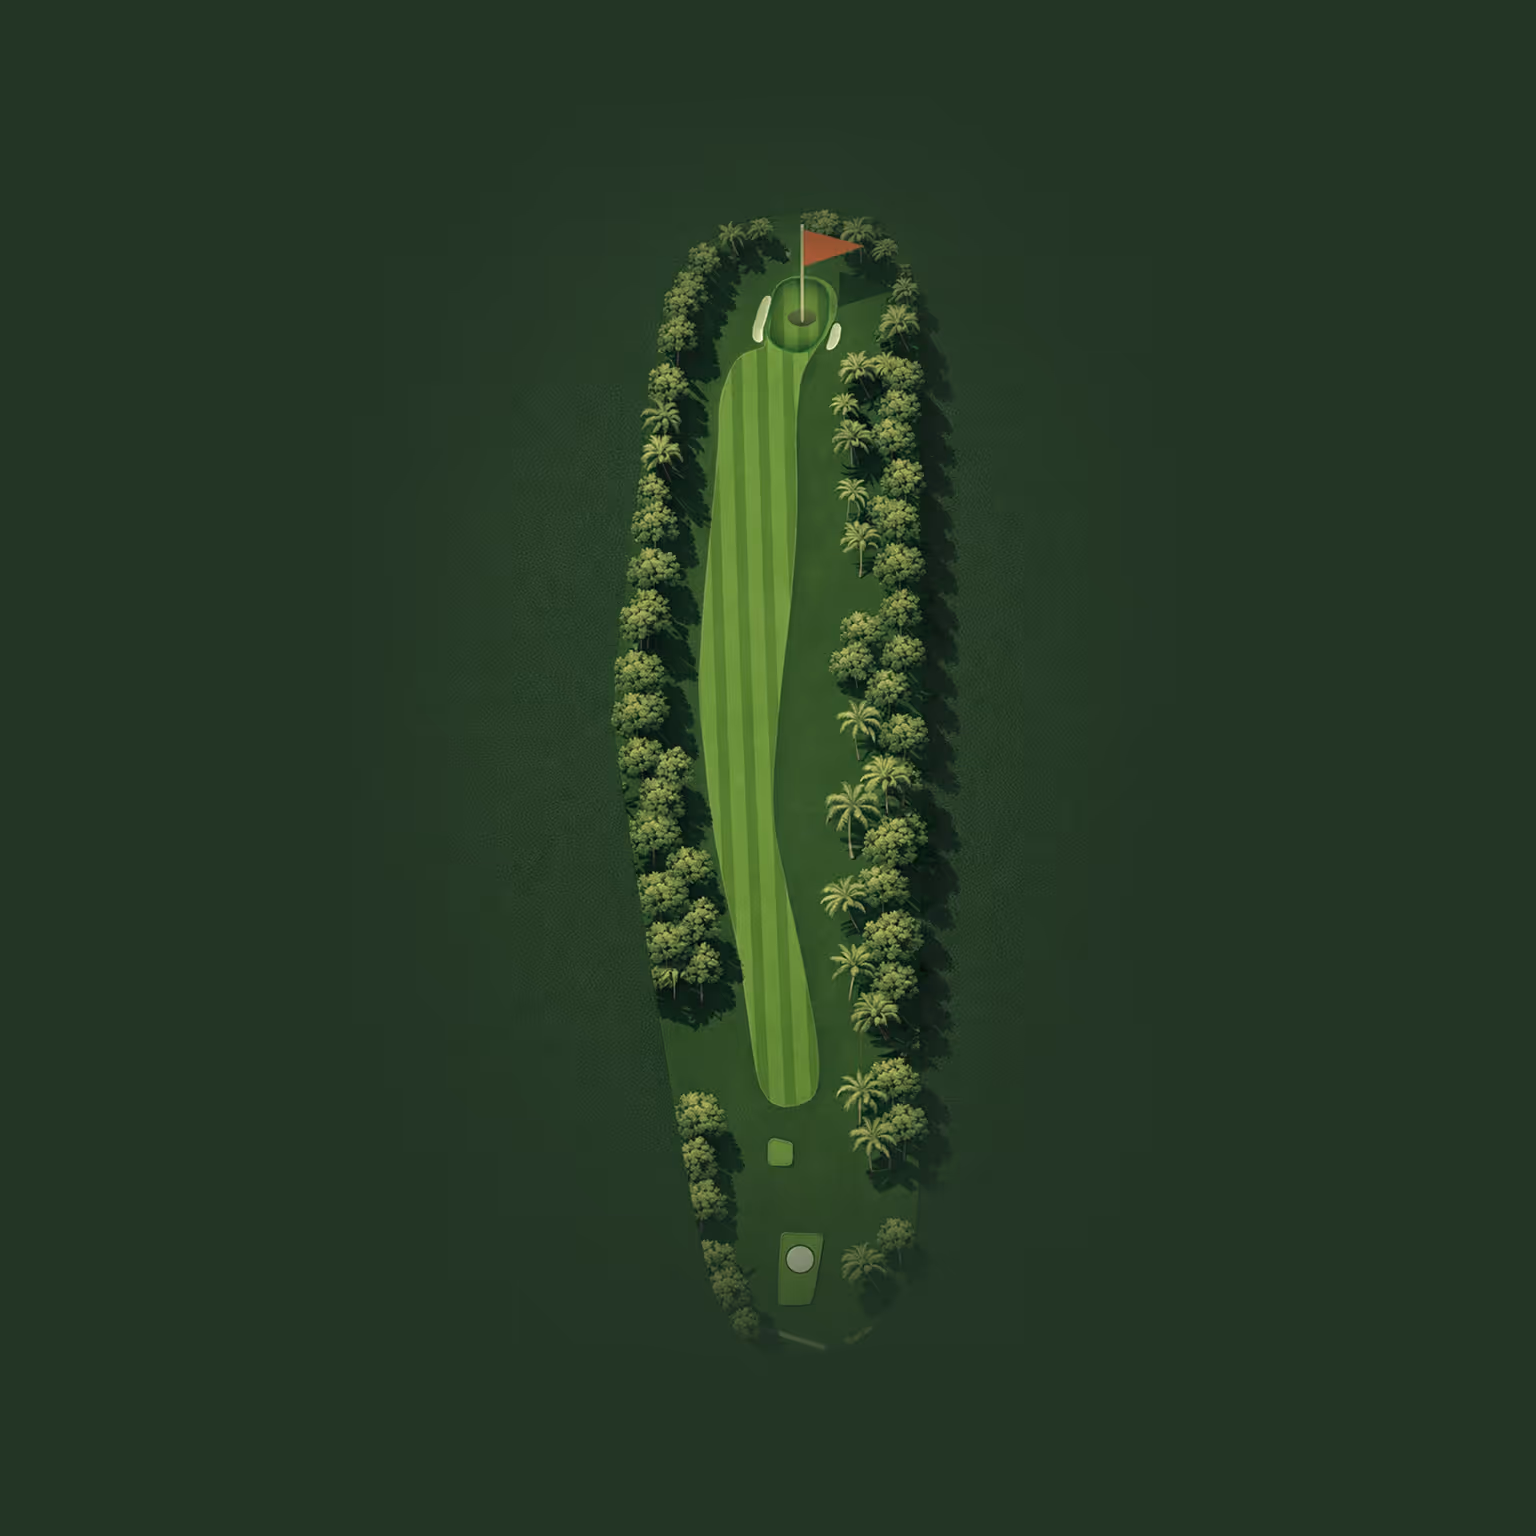
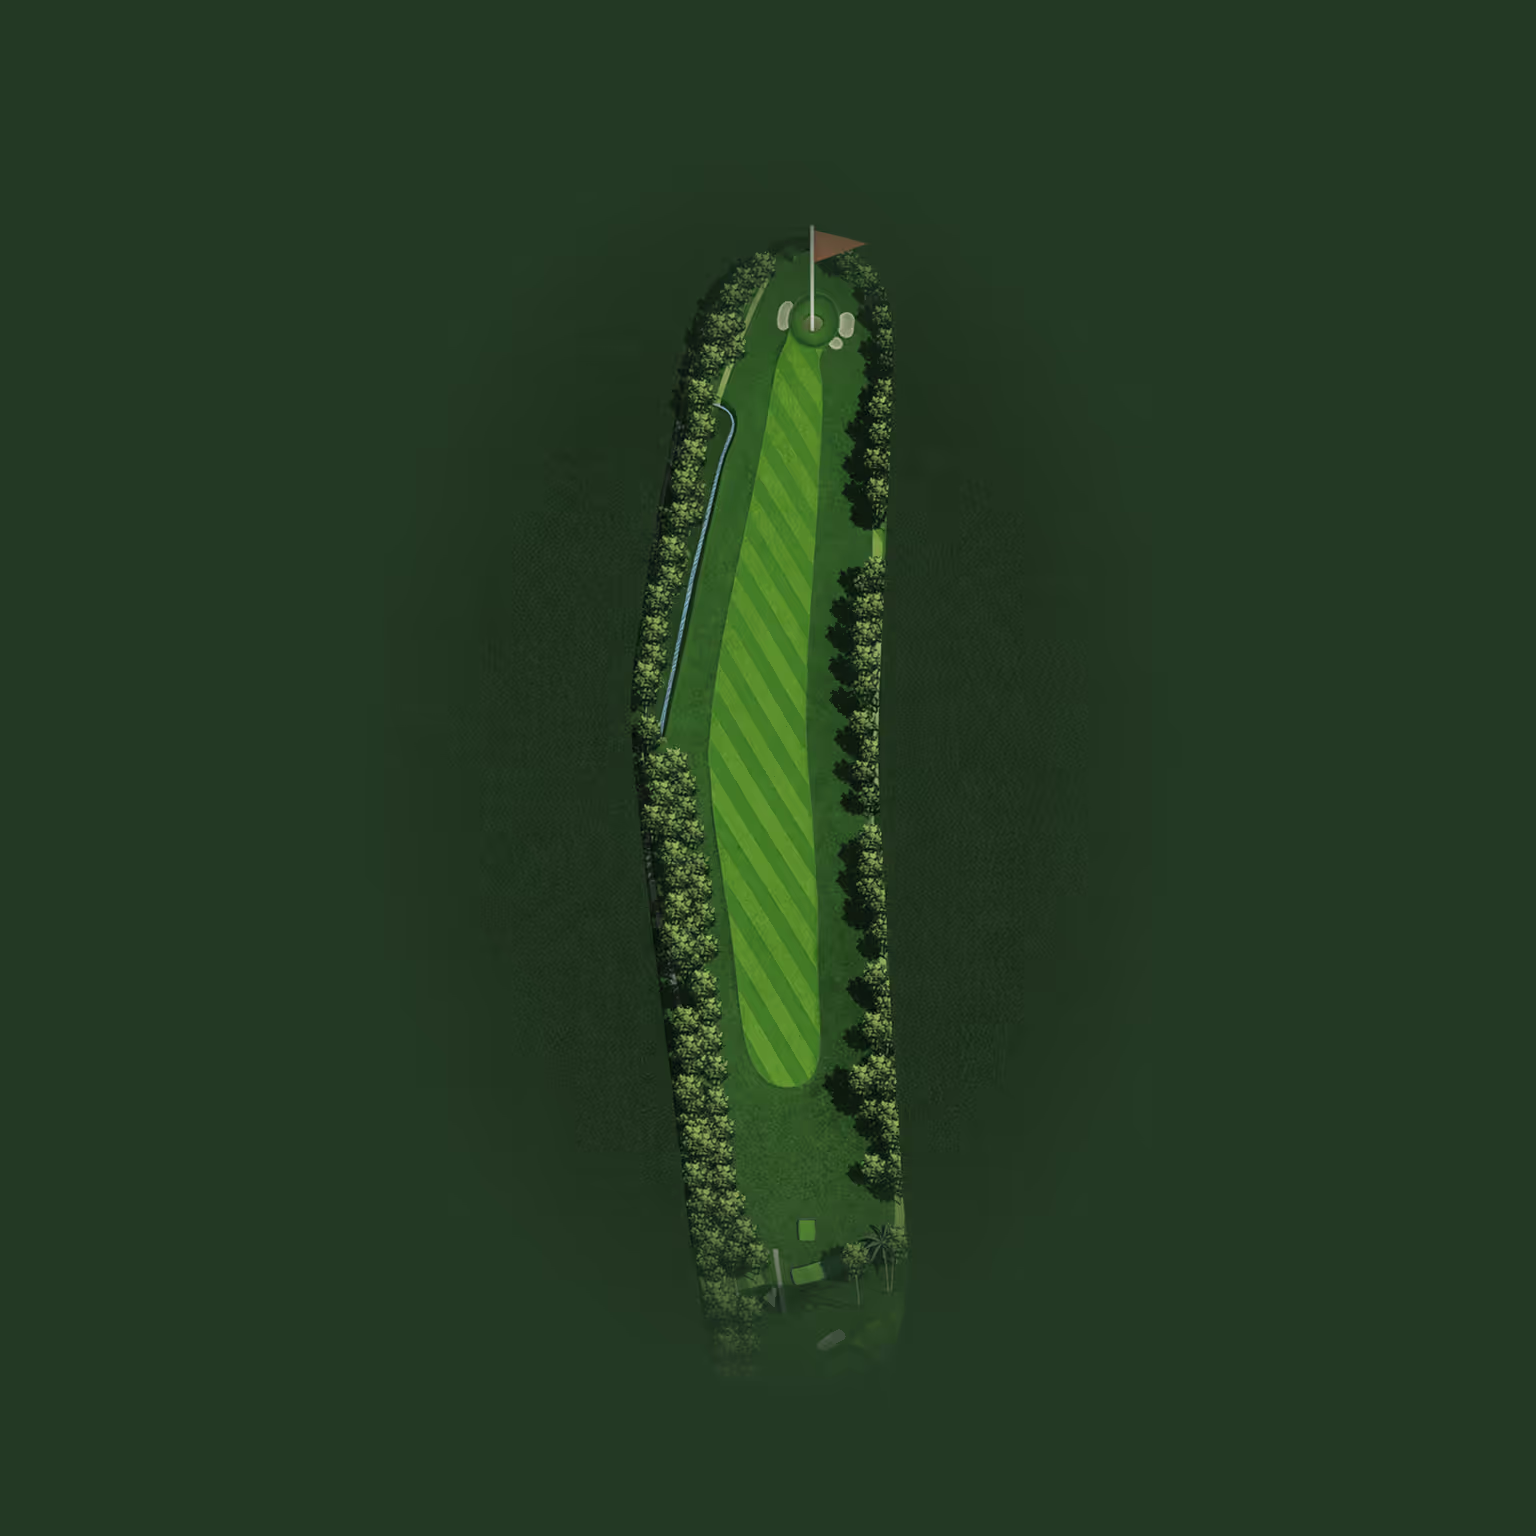
The longest hole on the course and will test out most clubs in the bag. This is not a hole to lay back too early, distance matters but be patient. With a wide opening fairway to start, avoid the tall and majestic trees on the left. If found in there, you can still play out, however through all of this hole, right side is dense mangrove bush so you'll be dropping a ball if you find yourself anywhere on the right out-of-bounds. Missing short of the green is safest as long brings additional creek trouble. Bogey is a good result.


A demanding short par 4 that asks you to think before you swing. Trust your Caddie's advice with the safest play is left side of fairway from the tee, ideally reaching the dog-leg corner to open up a view of the green but not many will carry to the corner so will face a semi-blind, high approach over trees, on the corner. Know your club stroke distance and then commit. If not on green or in bunker you'll be happy to chip to green. The green is one of the more challenging with two-tiers, plays slow. Deepding on flag placement is far tougher to approach from the back of hole or green. Par here is earned and will feel like you've made four good solid golfing shots.
A well-framed par 3 that rewards a confident strike. Typically a 8-6 iron, this hole is sheltered from the wind but demands accuracy. The green slopes back to front and slight left to right, making putting more challenging from eiether side of the hole. Missing short is the safest option, with an open approach allowing a chip and run if you're not on the green in one. Landing in bunkers or long leaves a much tougher recovery. A genuine birdie chance if you find the putting surface in front or behnid the hole.
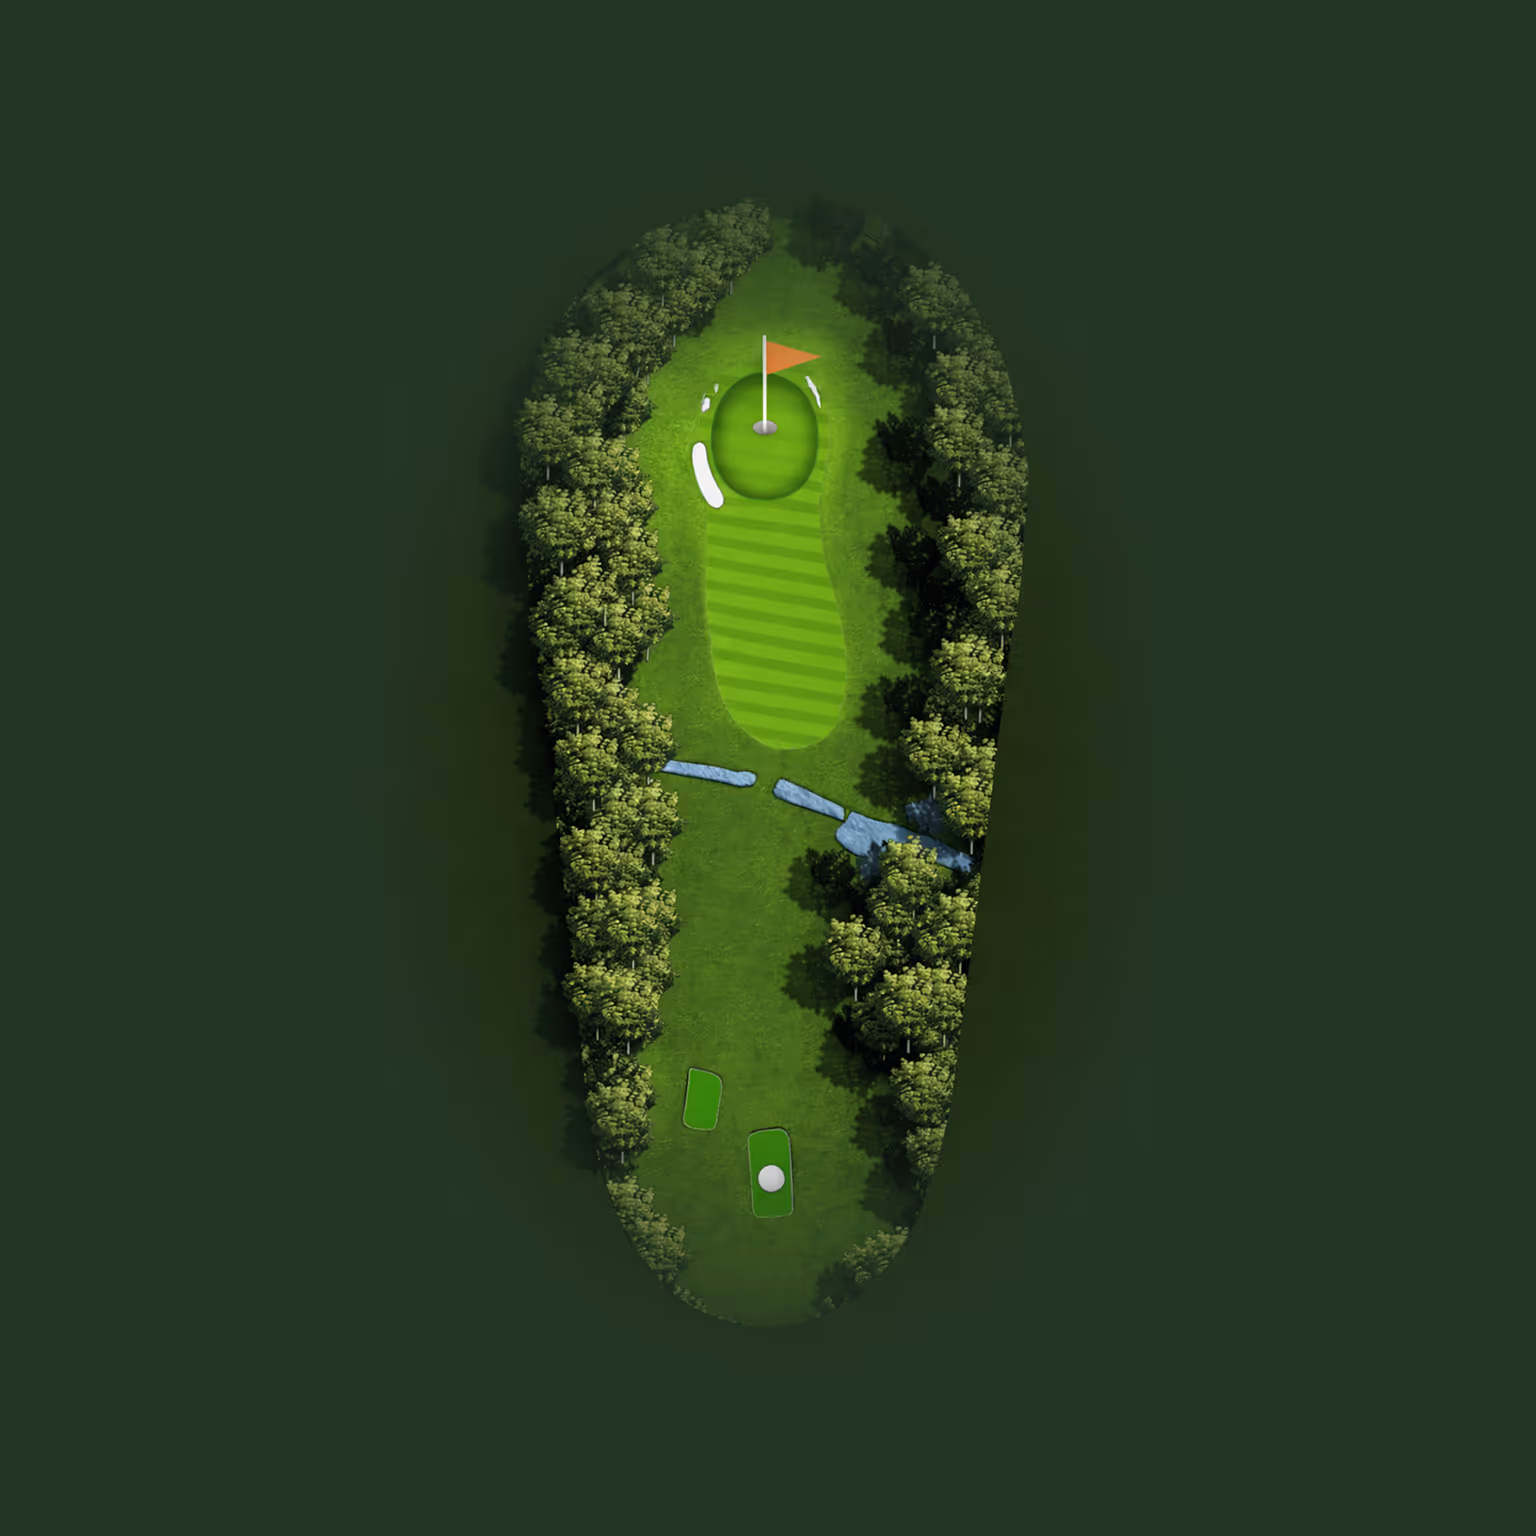

A visually tight tee shot that rewards commitment. From the tee, you must steer the ball through a narrow opening before the fairway opens up. Aiming right side on fairway from tee is best as it takes impressive tall trees on the left out of play and a line to the green. Most may not clear trees on dog-leg so 2nd shot towards hole can become tricky with a creek across fairway just prior to green. At green, bunkers guard both sides. Avoid going long as ground not as green or forgiving to get purchase under ball. The green plays flat(ish) but slow green. For high handicap, a boggie would be a good result to take.
One of the most enjoyable and post-card holes on the course, both visually and strategically. The drive is straight and relatively forgiving, with room either side of the fairway if you stray slightly off line. Driver is the sensible play, setting up a long second with a fairway wood or iron. Missing short or to either side of the green leaves manageable recoveries, while long brings those great looking big trees into play. Framed by tall trees from tee to green, this is a genuine par opportunity and a chance to enjoy the setting.


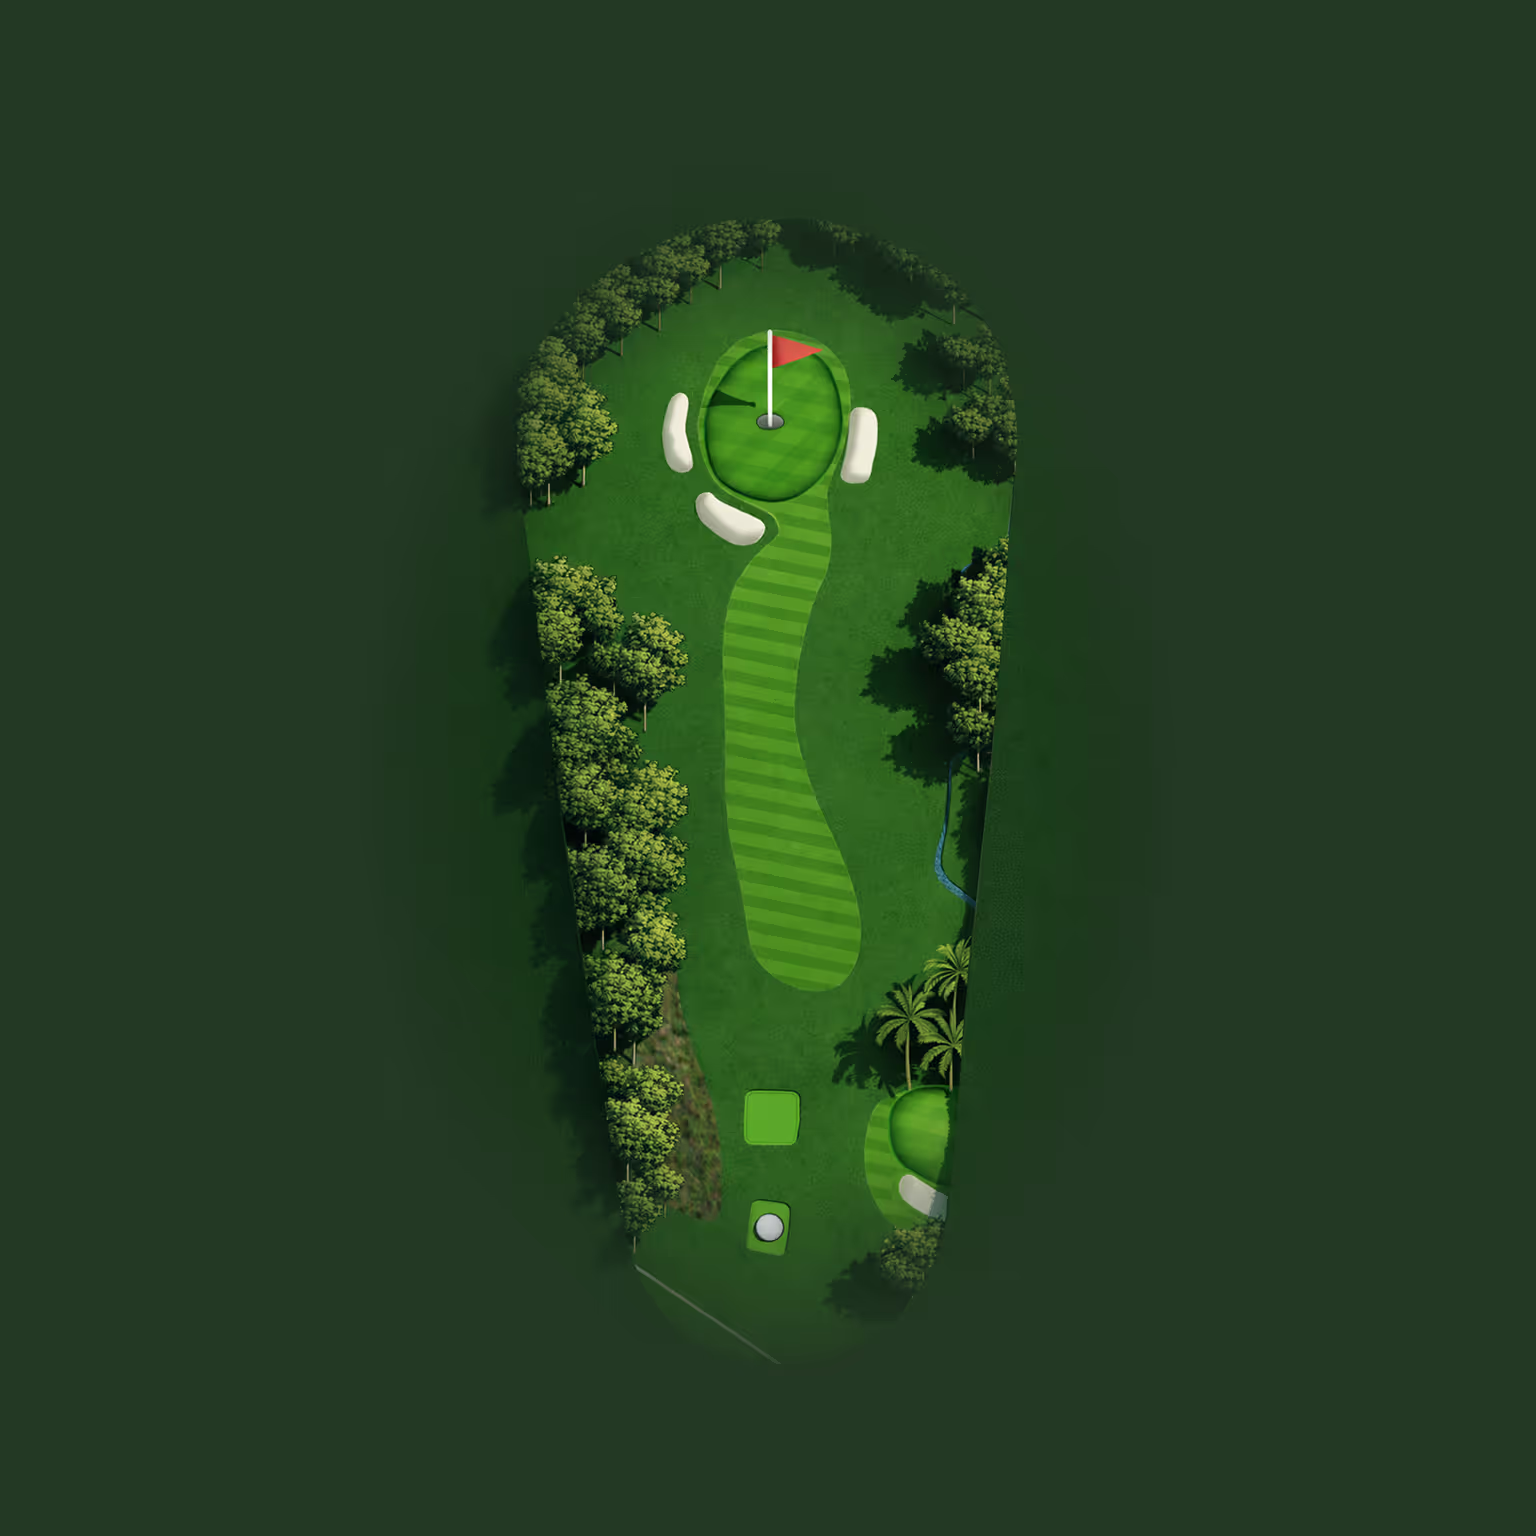
A longer par 4, and similar to the previous hole, it rewards solid ball striking and keeping out of trouble. The fairway is generous and allows recovery if you drift slightly off line. A strong tee shot leaves a fairway wood or low iron for approach to an elevated but receptive green. Missing short is the safest option, as shots long leave a difficult recovery from under the trees where there is little grass. Par is the goal here, but also be happy with a bogey.
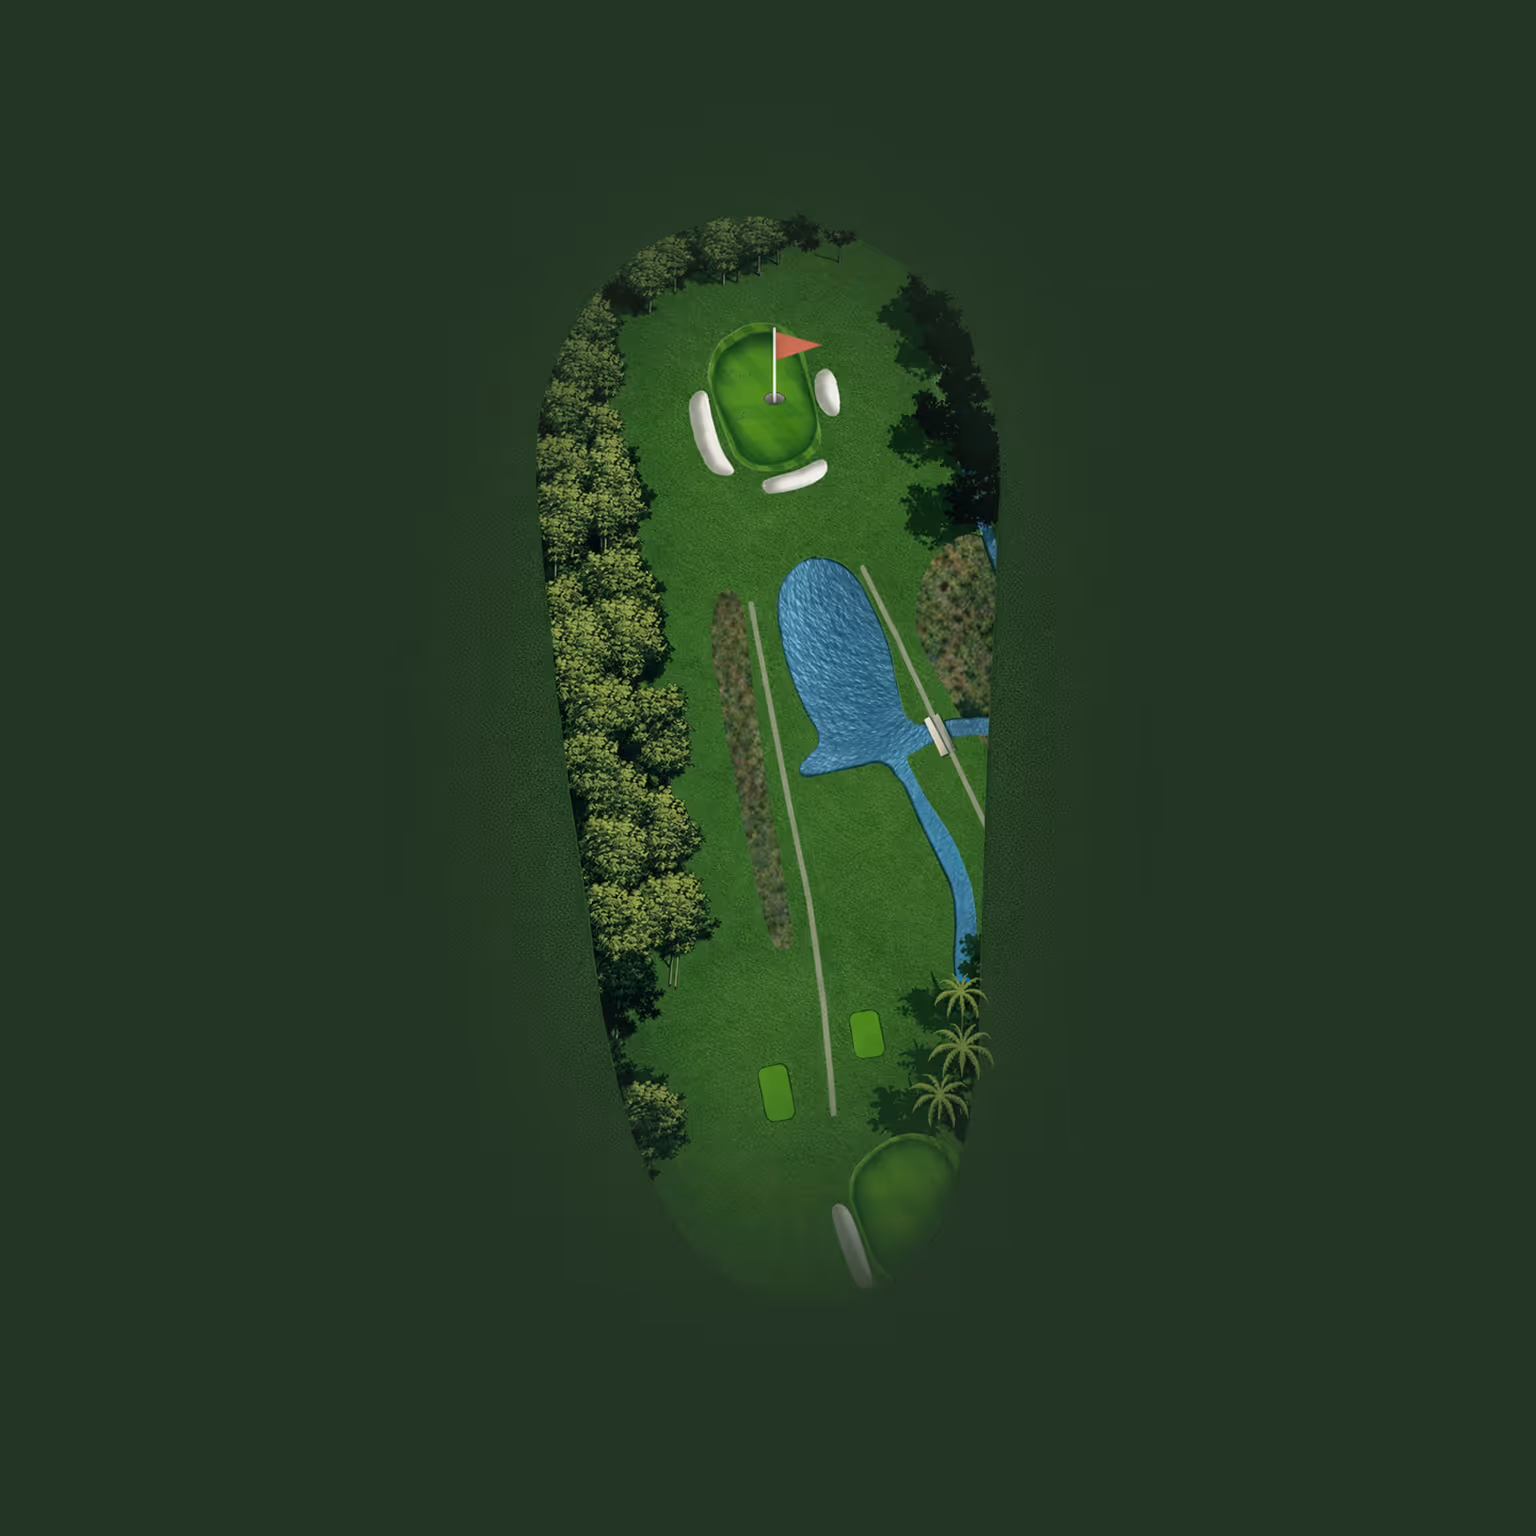
A demanding finish to the front nine that tests both commitment and hole management. The tee shot must carry a long marsh in front and need a straight drive to be secure, any hook and you may lose your ball. Be happy with fairway to set up two more good strokes to be on the green. This is a true three-shot par 5 for most, so for your long second stroke keep in the centre or right side of fairway to avoid softer, longer grass, undulating fairway ground on the left. Be aware of a cheeky hidden creek that catches many players out around two thirds up the hole. Missing short of the green is again best however recovery is easier from off green. Bogey is a good score heading to the clubhouse.


Hopefully you've had a chance to recharge with some fantastic refreshments from Hahia's canteen in the clubhouse and we're into the back 9.
To start is a wide and forgiving opening fairway, however with a busy road running alongside and close to the fairway it can play a few mental tricks. Especially if you draw or hook your driver. Aim middle or slightly right, using a group of small palm trees down fairway as a useful target. Attack the second shot as the green is open and welcoming with no sand hazzards. If on the flat green it plays slow, with dense grass surface affecting break and pace. A good chance to reset with a solid par.
A deceptive hole that often plays tougher than the card suggests. The fairway is wide, but soft ground and long rough on the left punish careless shots, so favour the middle or right side of fairway. Watch out for the hidden creek across the fairway two-thirds up so you'll need to ensure your second shot get's up off the ground. If approach long or into the side of green then bunkers makes recovery more demanding. Don’t force it and this may be the double bogey but respectable result.

A delightful short par 3 and a genuine scoring opportunity. Framed by bush and marsh, and occasionally a curious mongoose seen scurrying across the fairway. This hole as with many par 3's asks for a confident swing rather as the green is pretty large. A solid 6-8 iron aimed at the heart of the green is the right play as the green is open at front and so forgiving if landing short. The putting surface slopes from back to front and runs slower than it looks, so give putts a good nudge. Misses to either side leaves either chips over or out of bunkers. Long is manageable but recover will need a good up and down wedge as there will be less likely a pitch and run onto green. However, if your on for one, the green shows a birdie is very much in play.
Coming straight off the short par 3, this hole asks you to reset mentally. The tee shot must thread through a gap beside the 12th green and marsh bush areas, before opening into a wide, gently curving fairway. Aim for the middle or slightly left and resist the temptation to hug the right-hand tree line, which often leads to tree trouble as it curves gently right. It's not a panic on the right as it's the tree line to the 11th hole so opportunity to play out of trouble from a fairway lay. This is a long par 5 that rewards good hole management rather than aggression and luck. The green is relatively small and well guarded, with tougher bunkers, rough turf and and a creek on the right. Missing short or left is safest. Bogey is a good result.

A true thinking hole and one where discipline matters. The tee shot is best middle or right of the fairway. Be careful of going too right, there's trees, creek and marshland ready to punish the stroke that fades too long. If your tee shot is left on the fairway there are two main options. Depending on your lay, advice from your Caddie will be very valuable now on how you're hitting the ball and their local knowledge. If on the left of fairway but close to the marsh trees ahead, the brave "could" go over the dog leg area on to fairway (if you do, you will be rewarded with a short iron onto the green). Not recommended, but plenty will try (famous last words being "it felt like I could do it"). It's ambitious and may cost a ball if you get it wrong. To play the statistics you'll play to the right fairway area to get around the dog leg and then look for a solid third iron straight to get to green. The green itself is flat and slow so putt confidently. For most, a bogey here is good result.
A welcome chance to be positive after two demanding par fives. This left-to-right curving par 4 is framed by tall trees but offers more room than it first appears. Driver is a must, aiming middle or slightly left to open up a clean approach. Even shots drifting right usually leave recovery options. The green is straightforward, with only a gentle slope back to front. Late in the round, this is a hole to enjoy, stay hydrated, and trust your swing. Par is very achievable, with bogey a solid fallback.


An exciting late-round par 3 that looks inviting but still demands a great swing. At around 160 metres, this hole plays slightly uphill and offers several club options, from a long iron to a controlled recovery wood. If off the green, both sides still present good recovery options even with bunkers. Avoid drifting too far either side, where trees, particularly left, can complicate things. A genuine chance at par or even birdie!
One of the best looking holes on the course and a fitting calm and enjoyable hole to reflect on a great round on a wonderful, unique course. Framed by tall mahogany and palms, they guide you down this short par 4. They invite a confident drive anywhere onto the fairway, with a slight favour left opening up the best approach angle in. Wind is rarely a factor here, and recovery is also possible if you stray wide. Bunkers guard the green but the putting surface itself is gentle and fair. Late in the round, this is a real chance to secure a par before heading home.


A demanding and solid par 4 golf hole that asks you to stay focused right to the end of the round. The drive needs to find the fairway and ideally favouring the right to set up a straight line approach past a lone tree on left, and creek across the fairway. There’s no reward for being timid on the second stroke, it’s the last hole so a committed shots are essential. Bunkers flank the green, but the surface itself is fairly flat and slightly quicker than most. Finish with confidence. With the clubhouse nearby and eyes watching, a solid bogey is a satisfying way to finish but even better with a par!
Become part of this friendly golfing community.
Members enjoy regular activities, constantly improving ammenities and the kind of experience that only comes from a club dedicated to the game.